
There are multiple ways to implement player movement in Unity. In a previous guide, I explained how to implement player movement in Unity using physics. This guide will look at an approach that is more suited for arcade games so we will have a non-physics player movement. Of course, depending on the game you are developing, you might want to use it for a non-arcade game.
In this series of guides, we will look at the Space Invaders game and implement core mechanics from it, starting with the player’s movement. In following guides, we will also look at shooting, creating multiple types of enemies using inheritance and more. If you don’t want to miss the next guide in the series, be sure to signup to the newsletter.
For those of you who prefer a video tutorial over a text one, here is a video version of this tutorial.
I am starting to upload content more often. You can except for more programming guides, shader guides, implementing mechanics from different games, implementing algorithms in Unity, and more so be sure to subscribe.
Setting Up the Scene
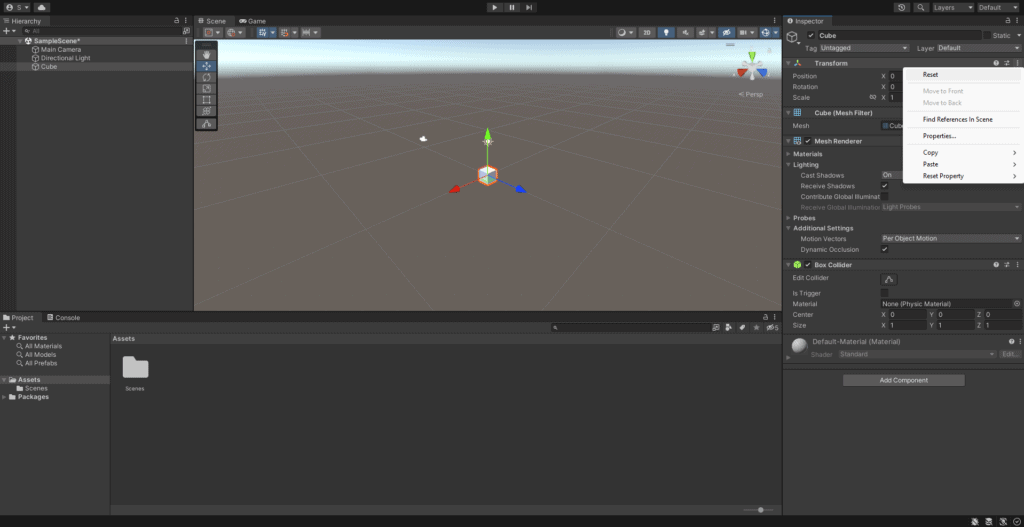
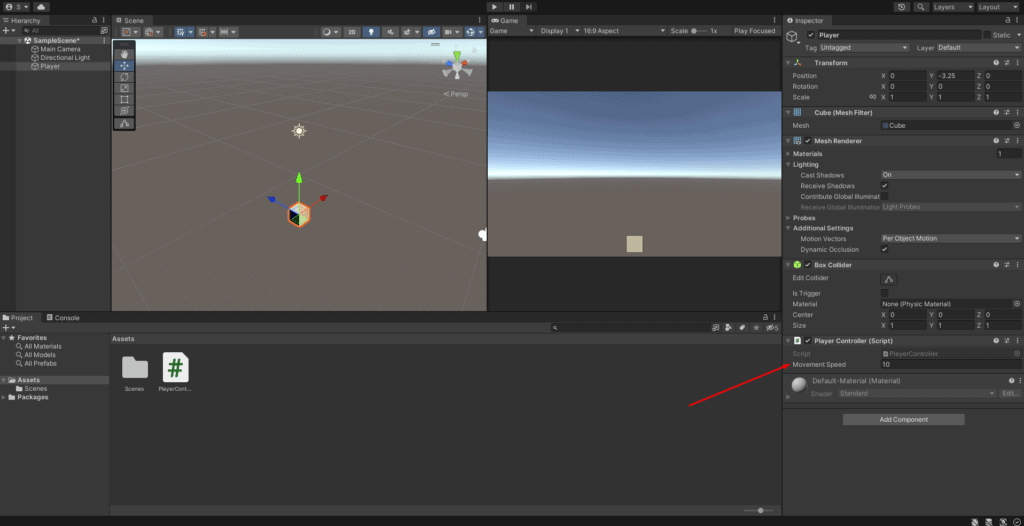
For now, we don’t have much to do. We will start by creating a new game object for our player and naming it “Player”. I am going to use a simple cube but feel free to use another game object or even a game object you modeled. Also, make sure to reset its transform component.
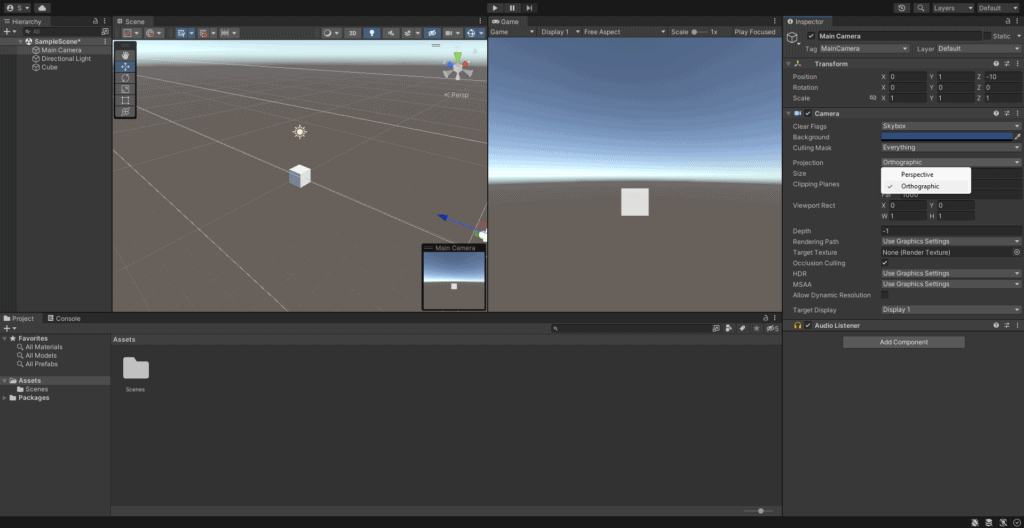
Since this is an arcade game, let’s select the camera and set its Projection field to “Orthographic”.
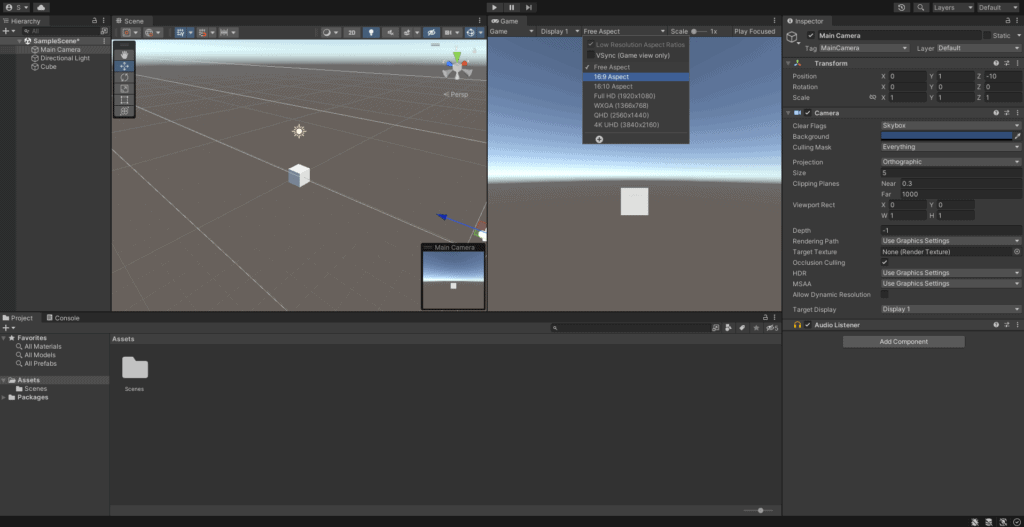
For convenience, I will set the Game view to aspect of 16:9 so I can see what the game will look like on a regular screen. After that, I will move the player game object to the bottom of the screen.

That’s it for setting the scene for now. Let’s write the script for the player movement.
Implement Player Movement with Script
Let’s start by creating a new script called “PlayerController” and assigning it to the player game object. Then, open the script for editing.
Basic Movement
For now, we don’t need the Start method so let’s delete it.
To get the input from the player, we will use Unity’s Input.GetAxis method.
Edit the Update method like the following.
using System.Collections;
using System.Collections.Generic;
using UnityEngine;

public class PlayerController : MonoBehaviour
{
    // Update is called once per frame
    void Update()
    {
        float horizontal = Input.GetAxis("Horizontal");
        transform.position += Vector3.right * horizontal;
    }
}
Let’s talk about the following line.
float horizontal = Input.GetAxis("Horizontal");Will get the input from the player for the left and right keys. It will also consider A and D as left and right respectively. Left being translated to -1 and right to 1. If we were to use a joystick, the further left the player moves the stick, the values will be between 0 and -1. 0 when the joystick is in the middle (at rest) and -1 when the joystick is to the left. The same with the right side, the further the player moves the stick to the right, the value will be between 0 and 1. 0 when the joystick is in the middle (at rest) and 1 when the joystick is to the right.
transform.position = Vector3.right * horizontal;The Vector3.right is a predefined Vector3 with the value (1, 0, 0). We then multiply it by the player’s input. This will evaluate values between (-1, 0, 0) to (1, 0, 0). We then assign the evaluated value to the player game object’s transform component
Save the script, go back to Unity, and hit play.
You can see the player moves but he moves way to fast and we have no way to control the movement speed. Let’s add the ability to control the player’s movement speed.
Player Movement Speed
Go back the the code, add a new float variable called “movementSpeed”, and initialize it with the value 10. Then, add it to the Vector3.right multiplication. Also, to smooth things out, also multiply it by Time.deltaTime.
using System.Collections;
using System.Collections.Generic;
using UnityEngine;

public class PlayerController : MonoBehaviour
{
    public float movementSpeed = 10f;

    // Update is called once per frame
    void Update()
    {
        float horizontal = Input.GetAxis("Horizontal");
        transform.position += Vector3.right * horizontal * movementSpeed * Time.deltaTime;
    }
}
Save the script, go back to Unity, and hit play. You can now see the player moves slower. Additionally, we can now change the player’s speed using the inspector.
Nice! this concludes the non-physics player movement part. But… did you notice that if you hit play and move the player game object to either sides, you can keep moving it. In most game, if not all of them, the player’s movement is limited to the map. So let’s do that too and limit the player’s movement.
Limit the Player Movement
There are multiple ways to limit the player’s movement and there is no right or wrong answer here. It is depends on you and the game you are developing. In this guide, I will show you two ways you can limit the non-physics player movement.
Imaginary Wall
In this method, we will create a new variable that will help us limit the player’s movement on the X-axis. we will then check if the player’s X position is greater than the limit for the right and lower then minus the limit for the left.
using System.Collections;
using System.Collections.Generic;
using UnityEngine;

public class PlayerController : MonoBehaviour
{
    public float movementSpeed = 10f;
    public float horizontalBoundary = 5f;

    // Update is called once per frame
    void Update()
    {
        float horizontal = Input.GetAxis("Horizontal");
        transform.position += Vector3.right * horizontal * movementSpeed * Time.deltaTime;

        BoundPlayer();
    }

    void BoundPlayer()
    {
        if (transform.position.x > horizontalBoundary)
        {
            transform.position = new Vector3(horizontalBoundary, transform.position.y, transform.position.z);
        }

        if (transform.position.x < -horizontalBoundary)
        {
            transform.position = new Vector3(-horizontalBoundary, transform.position.y, transform.position.z);
        }
    }
}
Let’s break it down.
First, we create a new float variable called “horizontalBoundary” and initialize it to 5.
public float horizontalBoundary = 5f;Then, we create a new method called “BoundPlayer” which we also call in the update method.
void BoundPlayer()
{
    if (transform.position.x > horizontalBoundary)
    {
        transform.position = new Vector3(horizontalBoundary, transform.position.y, transform.position.z);
    }

    if (transform.position.x < -horizontalBoundary)
    {
        transform.position = new Vector3(-horizontalBoundary, transform.position.y, transform.position.z);
    }
}
In this method, we check if the player’s game object’s position on the X-axis is higher then the limit. If it is, we tell Unity to set the player’s game object’s position to the limit on the X-axis (5 in our case) and for the Y and Z axes, we are using their current values.
We then also limit the player’s movement to the left. This time, we are checking if the player’s game object’s position on the X-axis is lower than minus the limit we defined. If it is, we again tell Unity to limit the movement by “manually” setting the player’s game object’s position value.
By now, your script should look like this:
using System.Collections;
using System.Collections.Generic;
using UnityEngine;

public class PlayerController : MonoBehaviour
{
    public float movementSpeed = 10f;
    public float horizontalBoundary = 5f;

    // Update is called once per frame
    void Update()
    {
        float horizontal = Input.GetAxis("Horizontal");
        transform.position += Vector3.right * horizontal * movementSpeed * Time.deltaTime;

        BoundPlayer();
    }

    void BoundPlayer()
    {
        if (transform.position.x > horizontalBoundary)
        {
            transform.position = new Vector3(horizontalBoundary, transform.position.y, transform.position.z);
        }

        if (transform.position.x < -horizontalBoundary)
        {
            transform.position = new Vector3(-horizontalBoundary, transform.position.y, transform.position.z);
        }
    }
}
Go back to Unity and hit play. You can see the player is now blocked and can’t continue beyond a certain point on the X-axis either to right or to the left.
This is great but a few things to notice:
- If we use this method, we have to make sure the player initials position on the X-axis is 0. If we want the player to start on a different X position, we will need to tweak the code a bit and instead of having one variable for the limit, we will need a variable for each side. In this case, left and right. Imagine what happens if we want to block the player’s movement on all axis. We will then need 6 different variables.
- If at some point we want to change the player’s movement boundaries, we will need to check what the limit number should be for each axis in each direction. This is again, 6 checks.
Knowing that we can understand this method is not very scalable. For those of you who don’t know “Scalability” is how easy it is to scale the project. Let’s explore another method for limiting the non-physics player movement.
Player Boundary with a Game Object
Let’s start by creating a new cube, naming it “Boundary”, resetting its transform, moving it down so it will overlap with the player, and scaling it on the X-axis so it will cover almost the entire width of the screen.
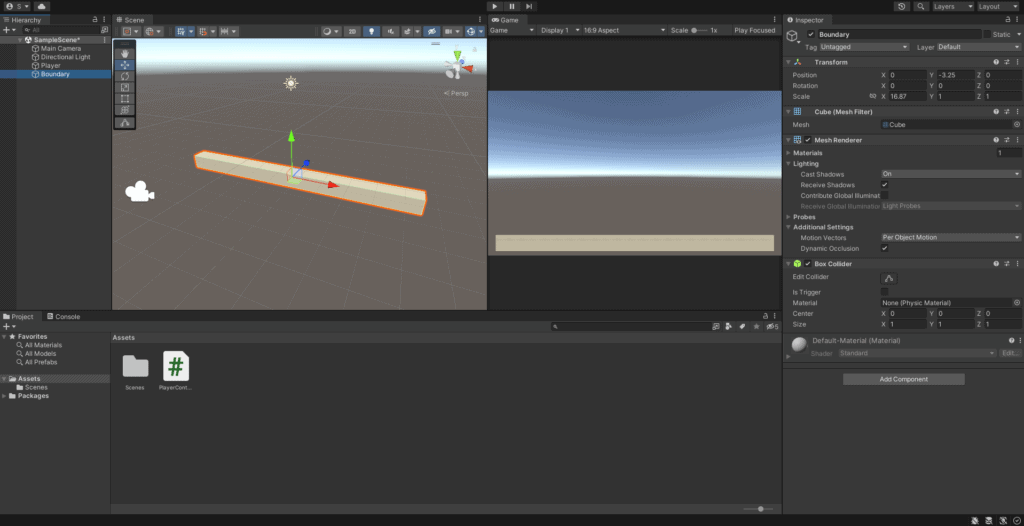
After doing that, let’s disable its Mesh Render component by ticking off the Mesh Renderer component. This will hide the game object in play mode.

Let’s open the PlayerController script again and create a new game object variable called “boundary”.
public GameObject boundary;In the Update method, let’s comment the call to the BoundPlayer method and create a new method called “BoundPlayerWithBoundaryGameObject”. Yes, it is a long name but it is just for the sake of this tutorial.
In Unity, each collider has something called “bounds”. From Unity’s documentation, bounds is “The world space bounding volume of the collider (Read Only)”.
In our code, we want to check the bound of the boundary game object and limit the player’s movement accordingly so the player can only move inside the boundary game object’s collider.
void BoundPlayerWithBoundaryGameObject()
{
    Bounds bounds = boundary.GetComponent<Collider>().bounds;
    float rightBoundary = bounds.center.x + bounds.extents.x;
    float leftBoundary = bounds.center.x - bounds.extents.x;

    // Bound right
    if (transform.position.x > rightBoundary)
    {
        transform.position = new Vector3(rightBoundary, transform.position.y, transform.position.z);
    }

    // Bound left
    if (transform.position.x < leftBoundary)
    {
        transform.position = new Vector3(leftBoundary, transform.position.y, transform.position.z);
    }
}
The first line in this method is saving the bounds of the boundary game object to a new variable for convenience.
In lines 2 and 3, we take the boundary game object’s center position on the X-axis and check what its X-axis extent is. The X-axis extent is the game object’s scale on the X-axis divided by 2. This values gives us the boundary game object’s most left point and most right point.
Next, we use these boundaries to limit the player’s movement in a similar way to the previous method.
Now, in the Update method, let’s call the new method. By now, your script should look similar to this:
using System.Collections;
using System.Collections.Generic;
using UnityEngine;

public class PlayerController : MonoBehaviour
{
    public float movementSpeed = 10f;
    public float horizontalBoundary = 5f;

    public GameObject boundary;

    // Update is called once per frame
    void Update()
    {
        float horizontal = Input.GetAxis("Horizontal");
        transform.position += Vector3.right * horizontal * movementSpeed * Time.deltaTime;

        //BoundPlayer();

        BoundPlayerWithBoundaryGameObject();
    }

    void BoundPlayerWithBoundaryGameObject()
    {
        Bounds bounds = boundary.GetComponent<Collider>().bounds;
        float rightBoundary = bounds.center.x + bounds.extents.x;
        float leftBoundary = bounds.center.x - bounds.extents.x;

        // Bound right
        if (transform.position.x > rightBoundary)
        {
            transform.position = new Vector3(rightBoundary, transform.position.y, transform.position.z);
        }

        // Bound left
        if (transform.position.x < leftBoundary)
        {
            transform.position = new Vector3(leftBoundary, transform.position.y, transform.position.z);
        }
    }

    void BoundPlayer()
    {
        if (transform.position.x > horizontalBoundary)
        {
            transform.position = new Vector3(horizontalBoundary, transform.position.y, transform.position.z);
        }

        if (transform.position.x < -horizontalBoundary)
        {
            transform.position = new Vector3(-horizontalBoundary, transform.position.y, transform.position.z);
        }
    }
}
Save the script and go back to Unity.
Click on the player game object and you will see a new field called “Boundary”. From the hierarchy view, drag the Boundary game object to this field.
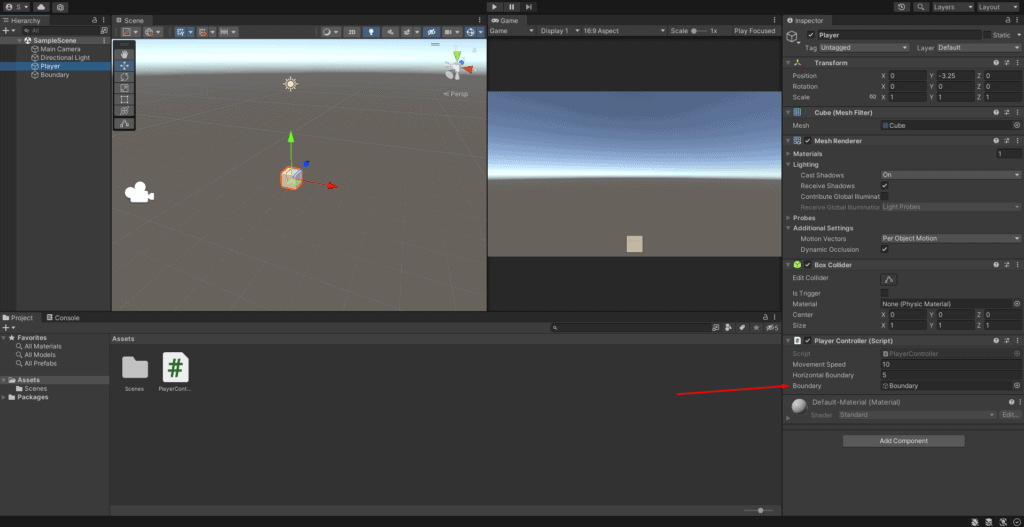
Enter play mode and you can now see the player can only move within the Boundary game object’s collider.
Here are some advantages of this method:
- While in play mode, try to scale the Boundary game object’s on the X-axis. As you can see, the player’s movement’s limit is changing accordingly.
- Still, in play mode, try moving both the player and the Boundary game objects in the Scene view and you will see no matter where they are, the player’s movement is still limited to within the Boundary game object.
Conclusion
In this guide, we saw a method to implement non-physics player movement and bounds in Unity. This method will usually be better for arcade-style games. We also saw two methods to limit the player’s movement which you can choose from.